There are many more amps equipped with built-in signage processing than there were just a couple of years ago, and that’s great news for installers. DSPs give them the power to configure audio systems in optimal ways. But there are two functions within DSPs that are rarely understood, and those involve knowing the difference between limiting and compression, especially in outdoor audio installs. [related]
I’ve observed that while most integrators have a good grasp of how to use frequency equalization (EQ) and hi/lo-pass filters, very few have a firm notion of what limiting and compression are, how they are different from the other options within DSP, and how to set them up to maximize system reliability, sound quality and client satisfaction.
Let’s explore the basics.
In high fidelity indoor music systems, particularly those with large speakers, and quality-audio conscious clients, you probably shouldn’t use limiting or compression. Music lovers and audiophiles cherish having the widest possible dynamic range.

But in distributed audio systems, and any system in a noisy environment, especially outdoors, limiting and compressing dynamic range can really save your bacon.
What Exactly is Dynamic Range?
In simple terms, dynamic range is the volume range between the softest and loudest sounds. A symphonic orchestra has a measured dynamic range of 85dB. That means the loudest sounds would be 85dB louder than the softest sounds you can perceive.
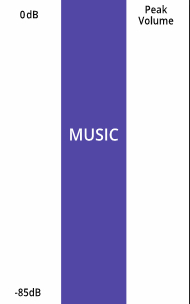
Figure 1 – click to enlarge
Even though high-resolution digital recordings can capture a greater range than 85dB, most recordings limit the dynamic range, so bear with me and let’s use 85dB for illustration purposes (Fig. 1).
Before starting making any adjustments described below, it is important to set the system volume to a typical listening level, as limiting, compression and volume are all interactive.
If you do your audible calibrations of any setting at non-typical listening levels, you won’t get the same results in real-life use.
Limiter & Limiter Settings
The name tells you a lot about what’s going on here.
A Limiter limits the maximum power output (volume) of an audio signal. If you have a 200 Watt/channel amplifier driving a speaker that can only safely handle 50 watts, the potential exists to deliver too much power to the speaker, causing it to distort and possibly break.
In the hands of responsible adults, that is rarely a concern. But a volume control in irresponsible hands (adult or not) can be disastrous and lead to costly service calls.
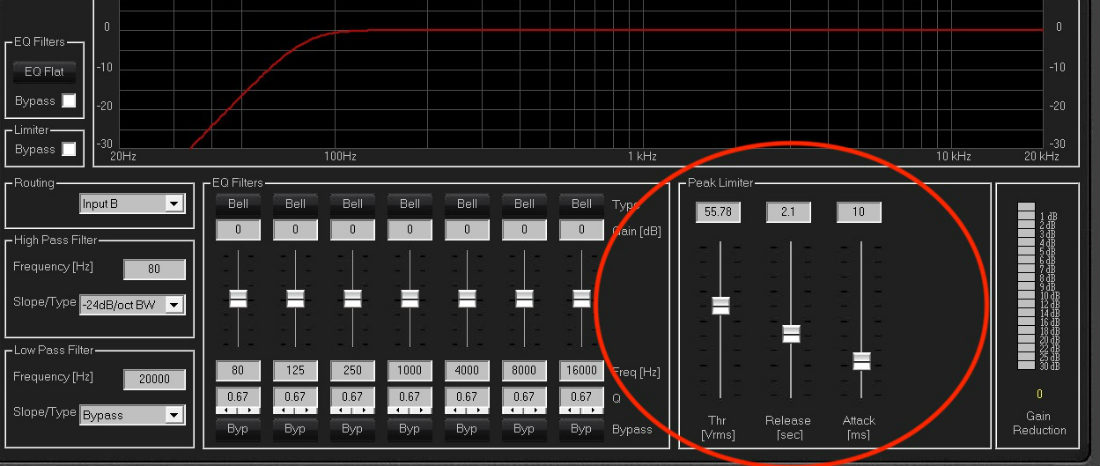
Figure 2: As shown here, threshold (thr) limits the amount of voltage that the amplifier section will deliver.
The limiter settings determine to what extent, how quickly (or slowly), and how long, the limiter circuit limits the output of the amplifier.
THRESHOLD limits the amount of voltage that the amplifier section will deliver (Fig. 2). The lower the setting value, the lower the volume level where the limiter will engage.
Using our example of the 50W speaker and the 200W amplifier, let’s aim for limiting amplifier output to 100W (Fig. 3). Why 100 and not 50? Because you always need reserve power to handle brief musical peaks. Choking off power prematurely can lead to poor sound quality.
Threshold settings can be expressed either in Watts, dB (decibel) or Voltage (Vrms), depending on the brand of amp/DSP you are using.
Figure 3 – click to enlarge
If the limiter setting is calibrated in Vrms, and you want to think in terms of Watts (like most normal people), use the formula: V2/Z=W (Voltage squared divided by the impedance, equals Watts. Examples: 20v2 / 8 (ohms) = 50 Watts), or 10V2/4 (ohms) = 25 Watts.
The inverse of the equation is √WxZ=V (The square root of Watts times Impedance = V. In our example we’re aiming for 100W limiting with an 8-Ohm speaker, so take the square root of 100×8 = 28V.
ATTACK defines the time it takes for the limiter to engage. A very fast setting like 1ms means the limiter will engage instantly to limit peaks. You don’t want to limit power that aggressively. For speaker protection purposes a slower setting like 50ms is a good setting.
RELEASE determines the time the limiter stays engaged. By carefully setting the Attack and Release, you can protect the speaker system without any undue side effects.
If your aim is simply to limit overall power output to prevent speaker damage only, then you can stop after setting the limiter. For other reasons, you might want to consider using a Compressor.
Compressor
If a tree falls in the woods and there’s no one there to hear it, does it make a sound? We use this old zen puzzle to illustrate how a compressor can really come in handy in outdoor audio installs. What good is music or movie dialog if wind, road noise, children, airplanes and other background sounds drown it out?
Zen answer: No good at all. The softer sounds in a music recording or movie fall below the ambient noise level rendering them inaudible.
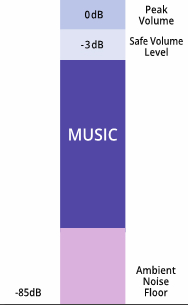
Figure 4 – click to enlarge
Outdoor background noise is usually in the 50dB – 60dB range (A-weighted). Most indoor environments don’t have enough background noise to be a concern but some, like indoor pools, exercise rooms and garages can have high enough ambient noise to be problematic.
Listen: How To Win More Meeting Room Jobs? Give Them Better Meeting Room Audio: Episode 34 of AV+
Wouldn’t it be nice if you could turn up the softer passages above the noise floor and at the same time bring down the loud sounds so they’re not too obtrusive?
Yes, it would be. Well that’s exactly what a compressor does – it compresses the music’s dynamic range on the top and bottom—in essence squeezing all the sounds into a tighter volume window (Fig. 4).
The compressor is an important tool to provide a rewarding project for you and a long-term satisfying listening experience for your client.
Knowing how much of each compressor setting to apply can be tricky. Understanding the capabilities and limitations of the speakers in the system is vital.
Don’t ask more of the speakers that they are capable of delivering without distortion, but don’t waste the dynamic strengths of high-performance speakers by over-compressing either.
Compressor Settings
Threshhold (Fig. 5) is the primary control, and its purpose is to set the point where the compressor begins to affect the loudest sounds—the top part of the dynamic range. The lower the setting value in dB, the greater the portion of a peak sound is compressed. Higher value settings will compress only the loudest signal peaks.
Start with a high setting and gradually lower the value until you start to hear the music lose its “snap” and “attack,” then back off the value a little. The point isn’t to scrub all the life out of the sound, just to protect the speakers.
Ratio determines the amount of compression (such as 5:1, 10:1, 20:1).
An uncompressed ratio would be 1:1, an extreme compression ratio where there is little volume difference between the softest and loudest sounds would be something like 50:1. Start conservatively with 4:1 compression. If quiet passages of the music are still drowned out by background noise, raise the value to 5:1.
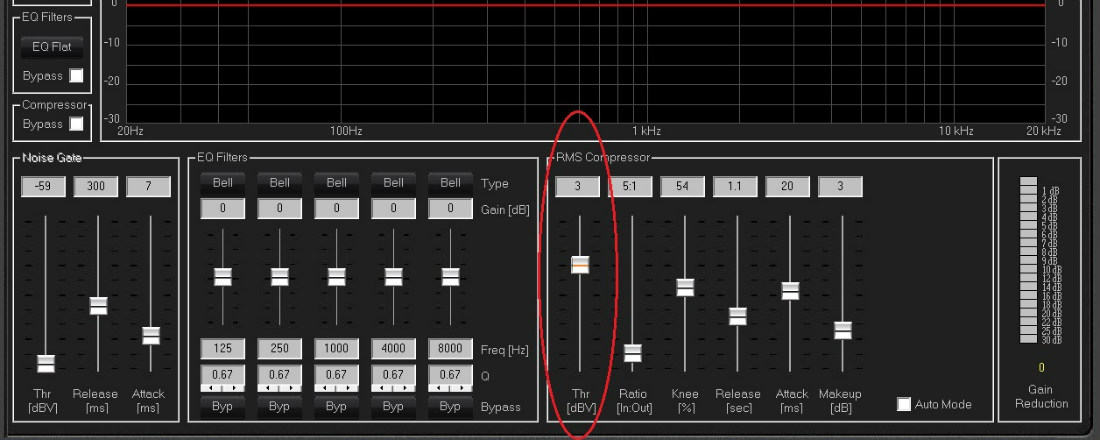
Figure 5: Threshold is the primary control, and is used to set the point where the compressor begins to affect the loudest sounds.
As with the Threshold setting, if the music starts sounding flat and unnatural with little “snap,” back off the control to a gentler setting.
The KNEE determines how “soft” (smooth) or “hard” (fast) the compressor engages. Some DSPs offer a simple choice of “hard” or “soft, in which case, we recommend you use “soft.” Some DSPs offer a sliding scale in which case case we recommend using a soft Knee setting mid-to-bottom of the adjustment range.
Attack sets how quickly the compressor action starts and release sets how quickly the compressor stops acting. Start with 50ms of attack and 2sec release and adjust by ear from there.
Another helpful functions found in some compressors (such as in the NEAR XL series amplifiers) are Auto Compression and Auto Knee (Fig. 6).
With these functions you only have to concern yourself with adjusting the Threshold and Ratio settings, making the job of finding the proper levels much easier.
Finally, a MAKEUP control found on some DSP systems can add back some volume lost as a result of compression being applied.
Trial and error is the best way to find the settings that yield the desired result. With time and experience you will get a “feel” for the audible effects of each setting. It is worth your time to learn these skills. The second system you set up with DSP limiting and compression will be easier than the first and so on until you are a true DSP pro.
Practicing Restraint in Outdoor Audio Installs
But like many things in life, too much of a good thing can turn ugly. If the limiting compression ratio is too extreme, you can run into audible artifacts that make the sound lifeless and just plain weird. If the music “pumps” or sounds “flat,” it is time to back off on the settings.
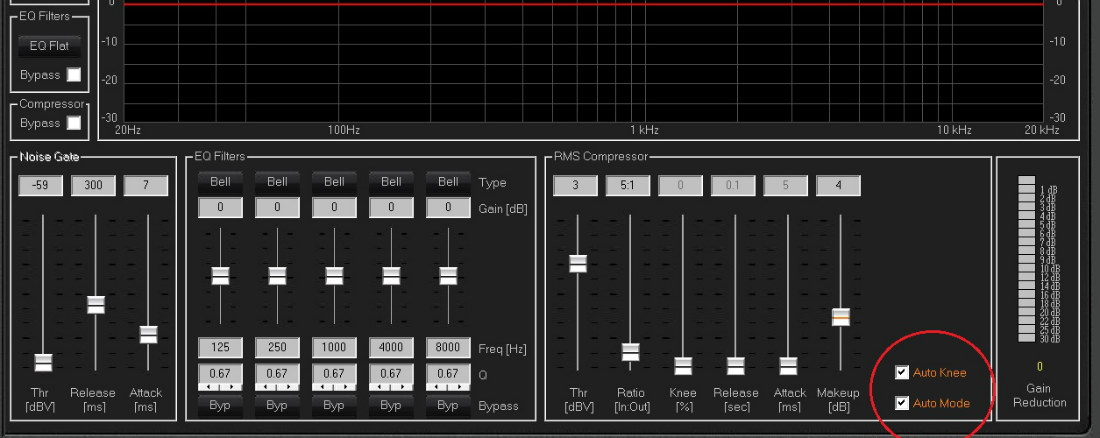
Figure 6: Auto Compression and Auto Knee allow integrators to focus on adjusting the threshold and ratio settings.
Manufacturers that offer both amplifiers and speakers sometimes embed DSP presets into their amplifiers that are carefully tuned to extract the best performance from specific speaker models. Those amps with Limiting and Compression would presumably have those parameters dialed-in appropriately.
Simply choose the appropriate preset for the speakers in the system and you’re in business. If the brand you’re working with does not offer pre-loaded presets, check with the manufacturer to see if they can provide downloadable DSP preset files.
This story premiered on our sister site, CE Pro. Learn more about NEAR Speakers here.


")